My Online Destination will help you to learn the basics of blogger, blogger widgets, seo tips, money making ideas

This blog is helpful for everyone looking to learn blogging or trying to make money online


Following are the some of the features of this blog -

  • Tutorials in this blog is explained in full steps.
  • We will try to reply to every comment on this blog.
  • We will never spam you if you subscribe to our blogs feed.

Saturday 13 August 2016

// // Leave a Comment

How To Write A Guest Post

Guest posting is a creative way of writing new articles on other's websites and blogs. This is an amazing way of sharing your content through other's platform. By writing your post on other, not only their readership will increase, but people will also follow to your own blog through backlinks provided by the host. It will help your blog to get more traffic and more subscribers.

How To Write A Guest Post?


Writing a guest post is not so simple as it sounds. It requires a lots of hard-work because writing a post in your blog is so easy as compared to writing on other's blog. It is not a easy job to get your post selected by the owner of that blog. You have to convince the owner that you are actually providing a good quality content that will help help their readers and help their blog to grow.

Here are some steps which you should follow to write a guest for others.

How To Write A Guest Post ?

1. First thing to write a guest post is to have a list of blogs that are willing to accept guest posts. There is a very simple way to find blogs that are ready to accept guest posts based on your niche.

2. Open Google search engine and look for the following terms - 
  •  "Your topic" + "write for us"
  • "Your topic" + "contribute"
Both of the above will generate a similar results 

Here is an example how it works - 
How To Write A Guest Post?


A simple google search on the topic 'seo' helped me to find thousands of blogs that are willing to accept my guest post on their blogs.

3. After making the list of few blogs for which you are going to request them, you have to contact their administrator and convince them so that they will agree to post your post on their blog and provide you a few backlinks. 
For this you will be writing a mail to them to describe about yourself. Here is a good way to contact them  - 

Hey (Blogger Name),
I am huge fan of (Blog Name)
And I would love to be your next guest author.
To just give you an idea of the quality I will be bringing to you, here are some of my recent posts:
1. Link 1
2. Link 2
3. Link 3

Here are some ideas I have in my mind :
1. Guest post idea 1
2. Guest post idea 2
3. Guest post idea 3

Let me know what you think.
Keep up the awesome work at (Blog Name)
Regards,
Your Name 

This is a good way of approaching to the web masters. In this way they came to know about your past work and also the ideas which you have for their blogs. Some blogs provide their own format and requirements, so follow according to it in that case.

Some More Tips On Getting Your Guest Post Approved

1. Write your post first before approaching anyone. The blog owner may immediately respond to you and ask for the content and in that case if you don't have it , they may kick you out.

2. Every blog have a different style of writing. So before sending it to them, try to know and write your content in their blog's style.

3. Providing a sample content is very important for some web masters. They will look for your past guest post on other blogs and then only they will decide whether to accept your content or not. It is good to approach low authority blogs first and get some experience to show for the high authority web masters.

4. Writing the content which is relevant to their blog. They are not going to accept it if you are not writing which will help their readers.

5. Don't include your affiliate links without asking their permission. Mostly, they will not allow to add your affiliate links. Only they will provide you a few backlinks. 

6. Don't give the web owner too much of work i.e your post should be completed byline, formatted and all the necessary images also included on your server so that the blog owner can directly post it without doing much efforts.


I hope this post helped you in writing guest posts. If you have any query or something additional to share with me then feel free to post in the comments below.
Thanks For Reading
Read More

Friday 1 April 2016

// // Leave a Comment

10 Google Tips For Online Safety

The world is getting smaller and smaller because of people doing more online stuffs than before. So, it is very important to be safe and secure while using web. Google is providing you these amazing 10 tips to increase your online safety.


1. Browse without a trail of cookie crumbs

You can go online without leaving the records of the sites you visit or the files you download.

10 Google Tips For Online Safety


In the Chrome menu select 'File' and then 'New Incognito Window'. On the Chrome app, touch the menu icon and then 'New Incognito' tab.

2. Sweep away unwanted software

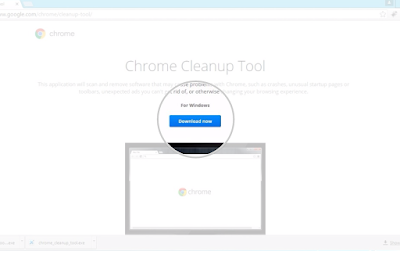
Use the Chrome Cleanup Tool to sweep your PC of unwanted software.

10 Google Tips For Online Safety


Visit https://www.google.com/chrome/cleanup-tool/ to download the tool. Open up 'chrome_cleanup_tool.exe' and install it on your computer.

3. Debut a fresh password

Protect your account by changing your password regularly.

10 Google Tips For Online Safety


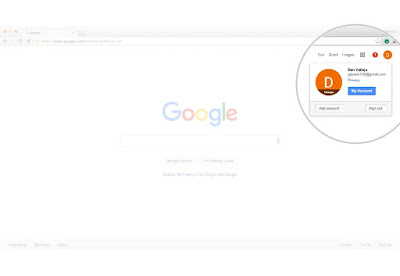
Sign into your Google account, click your profile icon and then 'My Account'.
Under 'Sign in & security' click 'signing in to Google'.
Click 'Password' to change your password.

4. Dust off your privacy settings

Choose the privacy settings that are right for you with a quick Privacy Checkup.

10 Google Tips For Online Safety


Sign into your Google account and click your profile icon and select 'My Account'.
Locate the Privacy Checkup and click 'Get Started' when you are ready to begin. Remember, you can change these settings as often as you like by repeating your checkup.

5. Keep the hackers out by updating your chrome browser

Update your browser to ensure you have the latest and greatest safety features.

10 Google Tips For Online Safety


Google Chrome automatically updates to the latest version every time you start it up, so you can get the most up-to-date security protection without any extra work. To double check, open Chrome and access the Chrome menu by clicking on the icon in the top right.
Click on 'About Google Chrome' in the drop down menu. The current version number is the series of number beneath the 'Google Chrome' heading.
Chrome will also check for updates when you're on this page. Click 'Relaunch' to apply any available update. Congratulations, you've just given your browser a clean bill of health!

6. Install a new lock only you can pick

Secure your phone using a PIN, password, pattern or even your face.

10 Google Tips For Online Safety


On Android, open your device's 'Settings' menu and under 'Personal', touch 'Security'.
Under 'Device security' touch, 'Screen lock'.
Touch the screen lock you'd like to use and follow the instructions.

7. Make intruders dance the 2-steps

Add extra account protection with 2-step verification.

10 Google Tips For Online Safety


Sign into your Google account, click your profile icon and then 'My Account'.
Under 'Sign in & security' click 'signing in to Google'.
Click '2-step verification' in the box on the right and then click 'Start setup'.
Follow the step-by-step setup process.

8. Get a security tuneup

Manage your security settings in just a few minutes.

10 Google Tips For Online Safety


Sign into your Google Account, click your profile icon, and select 'My Account'.
Locate the security checkup and click 'Get Started' when you're ready to begin.

9. Say goodbye to viruses

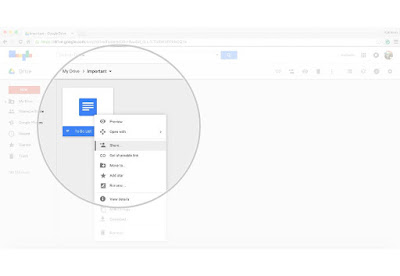
Use Google Drive to scan files for viruses before downloading or sharing.

10 Google Tips For Online Safety


Share or download any file stored in Google drive. If a virus is detected, the action will be blocked and a warning will be displayed.

10. Wipe your device clean, wherever you left it

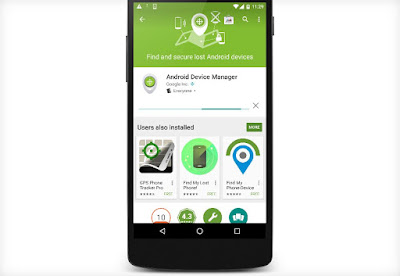
Remotely lock, locate, ring, or wipe your Android device from wherever you are.

10 Google Tips For Online Safety


Download and install the Android Device Manager app from Google Play. Open the app and sign into your Google account. From a phone, swipe along the bottom of the screen to see and select your devices. From a tablet, touch the arrow next to the device to select it. Android Device Manager will allow you to locate, lock, ring and or wipe your selected device from anywhere.

So those are 10 best tips from Google just to increase your online security. I hope you enjoyed it.

Thanks For Reading!!
Read More

Monday 15 February 2016

// // Leave a Comment

How To Create a Strong and Secure Password

Most of the people don’t care about their account’s security and passwords. They try to make their passwords as easy as possible so that they can remember it easily in future.  If you are using web for a while, then you must aware about passwords and its importance.  It is very important to make your password strong because there are so many stories available of hackers who have accessed sensitive information of other people and misused that information in one way or the other.

How To Create a Strong and Secure Password


It is necessary for us to follow certain precautions in creating a password for any type of personal account. Below are some useful tips for making a strong password for you.

Use different passwords for different accounts

Studies show that a 75% percent person uses the same passwords for different types of accounts. The password for their Gmail is also the password of their Facebook, Twitter and Paypal account. People uses this thing because they are so lazy in creating different password and using the same seems easy to remember for them. But, this is the biggest mistake and creates a big space for hackers to get into your account. Getting one account hacked means your every account hacked. 

Sometimes, it also happens that you share the password of any of your account which doesn’t contain any sensitive details. But, having the same password for others account too, makes them vulnerable to get hacked easily.

You should avoid using same passwords and secure your personal data from others.

Use password management software

As explained above that it is necessary to make different passwords for different types of account, managing such a long list of passwords is a tedious job for a normal person. The solution to this problem is that you should store all the passwords at a single secured place.

There are so many software available which can be used to store all the usernames and passwords of different websites which can be saved and accessed by a single password. In this way, you not need to remember all the passwords, only one password is sufficient to access all your accounts.

Avoid Patterns

People often use patterns to remember passwords. For example, if they have a password ‘facebook123’ for their facebook account and it is very likely that they will use ‘twitter123’ for twitter and ‘instagram123’ for their Instagram account. In this way all your accounts are on risk because having any of your account hacked makes other account hackable too.

So it is strongly advised that you should avoid using any type of patterns between any 2 passwords.

Change your password frequently

Keeping the same password for a long time increases the chances of someone figuring it out. People usually feel lazy (even me too) in changing their passwords because they have to remember it again.  But, if you change your password on a regular basis, say in every 3 months, then your account will be secured from hackers because it is almost impossible to find new password each time you change it. Also, the accounts which may be already hacked can get recovered by changing password frequently.

Avoid common passwords

Anything which can be related to you can be said as a common password. Common passwords can be your birthplace, your date, your pet’s name and many more. If you are using passwords like ‘12345’ or ‘qwerty’ (see in your keyboard) then your account may be on a risk.

Make Strong Security Question

People generally don’t care about security question which is required to recover a forgotten password and this is the biggest advantage to hackers. Having a little personal information, one can easily hack your account. 

Most of the time it is not your fault because the security questions are provided by websites only and they are so easy questions like what is your mother’s maiden name? , Your birthplace name, your pets name etc.  Hackers try these questions and it is very easy to answer these questions because they can be easily known to anyone.

The best solution for this problem is that you should give a wrong answer to these questions. There can be only 1 correct answer for a question but there is infinite number of wrong answer for the same question. So you have to use this technique to protect your account. Just select any of the security questions and give a wrong answer to it. Giving a irrelevant answers is even better. For example, suppose the security question is ‘what is name of your best friend?’ and my answer is ‘fingers’ which is not related to it. It is almost impossible for anyone to figure out it.

Make a Strong Password

After every possible step taken to protect your account, it is necessary to create a very strong password for your account. Following are some simple tips which will help you in creating a strong and secure password.
  • Make a password of at least 10 characters. Less than this is not considered as a strong password
  • No matters how long your password is, if it is in English dictionary then it is not a strong password
  • Always try to include both numbers and alphabets in your password
  • Use a randomly typed password i.e., type 15 to 20 characters randomly on your keyboard and use it as your password
  • Make password from your own life, for example, ‘My children’s name are Michael, David, Steven and Mitchell’ will make my base password as ‘midastmi’
  • Including numbers in the above password will make them even stronger like here I added their ages also. So password becomes ‘mi12da25st15mi8’.
  • You can further include special characters to make it more secure.For example, mi#12da#25st#15mi#8

These are some of the simple and useful tips in protecting your account and its personal data from the hackers. I hope you liked it. Don’t forget to share this with your friends and comment your personal views in the comments below. 
Thanks for reading 


Read More

Tuesday 2 February 2016

// // Leave a Comment

How To Protect Your Online Content From Thieves

As you all know, that writing and posting valuable content for your website or blog takes a lot of time and hard-work. All the efforts in creating a fresh and valuable content for your blog gets copied or stolen by thieves by just few clicks. Your content is your most important asset and you can't allow anyone to come and copy it somewhere else.

How To Protect Your Online Content From Thieves


Protecting your content from such thieves is the duty of every webmaster. It is not easy to look for each and every post of your site but you must do some hard-work to protect your blog's content as much as possible. In this post, I am going to tell you some methods by which you can protect your online content.

Disable Right Click

This is the very simple and most useful tip in preventing online content. Most people don't copy your content by typing line by line,  rather they just select and copy the content into their page. By disabling right click of mouse on your web pages, people can't select and copy the content. This is the best way to protect your work from thieves.

How To Protect Your Online Content From Thieves

Disable Right Click In Blogger

It is very easy to disable right click in blogger blog. Just follow these simple steps given below.

1. Login to your blogger's account.
2. Open your blogger dashboard and go to layout menu. Add a new gadget HTML/Javascript.
3. Copy and paste the following code into it. 
<!--MBW Code--><script language='JavaScript1.2'>function disableselect(e){return false}function reEnable(){return true}document.onselectstart=new Function ("return false")if (window.sidebar){document.onmousedown=disableselectdocument.onclick=reEnable}</script><!--Code End http://mybloggersworld.blogspot.in>

4. Save the gadget.

Now, you will see that the right click is disabled on your blog. 

Disable Right Click In Wordpress

It is much easier to disable right click on a wordpress blog than a blogger blog. There are so many plugins available for a wordpress user. Click here and install this plugin on your blog to use this feature on it.

Add Watermarks and Copyright notice

Copyright notices are the 2-3 lines of text which shows or tells the readers that the written post belongs to you and copying some or whole of it is against laws. These notices works great because by seeing such notice they will fear that they are breaking a law. Also, it don't take too much of time in adding such copyright notices with your post. 

How To Protect Your Online Content From Thieves


In similar way, you can also protect the pictures of your websites by adding a watermark. Adding a watermark makes the picture completely belongs to you and your site. People usually don't copy such pictures because using those pictures with your watermark will be awkward for them also.

Sometimes it also happen that people are not aware about copyright issues. They simply copy the content and not aware that they are stealing something. By using watermarks and copyright notices, you can avoid those people from copying your content.

Set Google Alerts

Protecting your content is one thing and catching the thieves who already copied your content is another important thing. After using all the necessary measures, there is always a chance of your content getting stolen by others. Google Alerts is a way to catch those people who are using your original content.

How To Protect Your Online Content From Thieves


Whenever someone copy and post your content, you will get a alert. To get an alert, you first copy few lines of your post and creates alerts to be notified when this content appear online. Creating multiple alerts for the same post works best. Also, it is better to set alert from the first paragraph because people usually copy first paragraph more than the rest.

By knowing who has copied your content, you can check whether they provided a link to your site or not. 

If your content is already copied ?

The above methods are the best measures to protect your content from thieves but, what about the content which may have already stolen by someone. How to know whether your post is republished at any other place and if yes, how to find it ?

The answer of above question falls in this section. Here, I am going to show tell you about the 2 best tool to search your content on the web.

Search Your Content

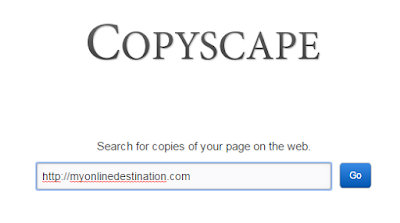
There are so many tools available to conduct a search of the web for any content given by you. One of such tool is Copyscape. Copyscape is a website on which you can put the URL of your post and then it searches the web for a web page containing the same content as in your link. It will tell you whether your content is safe or stolen by some thief.

How To Protect Your Online Content From Thieves


Search Your Images Using Reverse Image Search

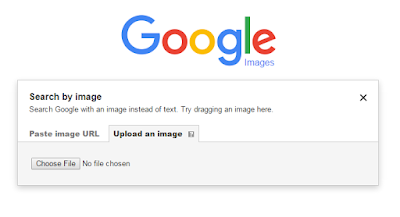
Like text, you can also search for images. If you have a particular image and you want to know if there is any copy of it on the web, then you can use a reverse image search tool. In this kind of tool, you simply have to upload the image (no matters what name you have given to it), then it will search web to find out its exact copy and show you the results. If that image is not stolen then it will only show your website in the result.

How To Protect Your Online Content From Thieves


Google Images is the best tool for this purpose. Click here to try it.

How to deal with theft ?

After doing so much of hard-work to secure your content there is always chances of getting your work copied. Whenever you came to know that your content is copied, your next step is to contact that website owner and discuss the matter. 

Prepare your evidence

It is important to prepare your evidence first before contacting the person because there is no proof that he copied your content from your website. You should be ready with proper proof that you were the first to publish that content online.

If your content is indexed on Google then you can show that date as a proof because you posted that content earlier than someone else.

Contact the Thief

After creating all the necessary evidences, its time to talk to that person. First, you should send a friendly message telling the person that he copied his content. You can decide whether you want that content to be removed from that site or you want a back link to your site indicating that you are the first one to publish that article.

In most of the cases, the blog owner will remove the content and your blog's content and ranking will be saved. If you get a negative reply to your friendly message or the blog owner not giving any reply then you can follow the next step.

Contact hosting provider

Now, its time to become serious and punish that person. You should contact their hosting provider and tell them what this website owner done to you. Here, you have to show your evidences and prove them that you are owner of that content. 

After this, their hosting provider will force him to remove that content and it is also possible that they will permanently remove his account. I am sure that till here your problem will get solved but if still you are struggling, then move to the last and most important step to remove that stolen content.

File DMCA Complaint

DMCA stands for Digital Millennium Copyright Act. You can submit a complaint to DMCA to tell them to deindex content which was stolen from your website. This is a very quick process and the stolen content will get removed within a short period of time. 

DMCA also provides you so many useful tools to protect your online content.  


These are some of the ways by which you can protect your online content. I hope you liked it.

Now its time to share your thoughts with me and the others.

Thanks for reading and don't forget to share it with others.


Read More

Monday 25 January 2016

// // Leave a Comment

How To Turn On And Turn Off Subtitles In VLC Media Player

Today, VLC is the best and most used media player in the world. People like to run their videos in this media player because it supports almost all the formats. It is very easy to use and you not need any skills to use it. VLC is available for both Windows and MAC.

How To Turn On And Turn Off Subtitles In VLC Media Player


One of its amazing features is the capability to run subtitles. Subtitles is used to show the audio in text format in some other language to make the clip understandable to people of different origins.
Sometimes it is useful for one person and annoying for other. In this post, I will show you methods by which you can turn on and turn off subtitles in VLC media player as per your needs.

Turn On Subtitles In VLC Media Player

Step 1 : Subtitles can be added to a video with the help of a .srt file. To run subtitles in a specific video, you need its srt file.You can easily download the srt file for a movie from the internet. Its size is very small.

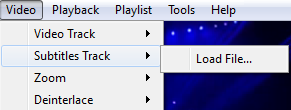
Step 2 : Open the video file in VLC. Go to Video>>Subtitles Track>>Load file.

How To Turn On And Turn Off Subtitles In VLC Media Player


Step 3 : Now, look for the saved srt file and open it. That's it. Now you can see subtitles below your video.
How To Turn On And Turn Off Subtitles In VLC Media Player


Turn Off Subtitles In VLC Media Player

Method 1

Step 1 : Open the desired video file in VLC.

Step 2 : Go to Video>>Subtitle track >> Disable.

How To Turn On And Turn Off Subtitles In VLC Media Player

Now, you will not see any subtitles.

Method 2

If first method don't works for your video, then you can use this alternate method.

Step 1 : Launch VLC media player and run the desired video file in it.

Step 2 : Go to Tools>>Preferences>>Subtitles & OSD.

How To Turn On And Turn Off Subtitles In VLC Media Player


Step 3 : Uncheck all the option like enable OSD, enable subtitles etc.

  Congrats !! You are done with it. You have successfully removed subtitles from your video.

This was a very simple guide on turning on and off subtitles in VLC media player. I hope you liked it.
Thanks For Reading

Read More
// // Leave a Comment

Widget To Show Total Number of Post and Comment In Blogger

Number of post and comments are the 2 things which tells the success of any blog. More comment your blog gets, more the trust builds among readers and the rank and traffic improves. Also, a successful blogger writes new post consistently. So it also have a good number of articles.

Widget To Show Total Number of Post and Comment In Blogger

In this post, I am going to tell you about a widget by which you can show total number of posts and comments on your blog to you audience. If you have a good number of post and comments, then it will create a good impression about your blog towards new readers.

Widget To Show Total Number of Post and Comment In Your Blog

Step 1 : Open your blogger's dashboard. Go to Layout>>Add a widget >> HTML/Javascript.

Step 2 : Copy and paste the following below code into it.

             <script>function mbhTotalCount(json) {document.write(parseInt(json.feed.openSearch$totalResults.$t,10));}</script><div style="font: 25px Georgia;">
Total Published Posts: <script src="http://www.myonlinedestination.com/feeds/posts/default?alt=json-in-script&amp;callback=mbhTotalCount"></script></div>
<div style="font: 25px Georgia;">
Total Number Of Comments: <script src="http://www.myonlinedestination.com/feeds/comments/default?alt=json-in-script&amp;callback=mbhTotalCount"></script></div>

Step 3 : Replace myonlinedestination with your blog's url.

Step 4 : Save the widget. 

That's it. You have successfully added that widget to your blog. Now, your blog will show total number of posts and comments till date to your readers.

I hope this small guide helped you in adding this widget on your blog. If you have queries, then feel free to ask in the comments below or you can email me also.

Thanks for reading.

Read More

Sunday 15 November 2015

// // Leave a Comment

How To Place AdSense Ad Just Below The First Paragrapgh ?

AdSense is the great source of earning money from a blog but there seems to be a major impact on earning due to the placement of ads on different places in the blog. Bloggers keeps on trying different techniques to get more clicks on their ads. You can try many places like headers, inside blog post, bottom of the post, sidebars etc. One of the best place to get more clicks is to put AdSense ad below the first paragraph of your post.

How To Place AdSense Ad Just Below The First Paragrapgh ?


It is not possible to directly put AdSense ad below the first paragraph. You have to make certain changes to avail this feature in your blog. In this post, I will guide you step by step to use this thing on your blog too. Just follow the below steps carefully.

Place AdSense Ad Just Below The First Paragraph

Step 1 : Open your blogger dashbaord. Go to Template  and edit the template in HTML form.

Step 2 : Search for <data:post.body/> using Ctrl+F. You may find it more than once, just stick to the second occurrence.

Step 3 : Now, replace it with the following given code.
             <div id='target'><data:post.body/></div>

Step 4 : Copy and paste the following code just below it.
              <script type='text/javascript'>
function insertAfter(addition,target) {
var parent = target.parentNode;
if (parent.lastChild == target) {
parent.appendChild(addition);
} else {
parent.insertBefore(addition,target.nextSibling);
}
}
var adscont = document.getElementById(&quot;content&quot;);
var target = document.getElementById(&quot;target&quot;);
var linebreak = target.getElementsByTagName(&quot;br&quot;);
if (linebreak.length &gt; 0){
insertAfter(adscont,linebreak[0]);


Step 5 : Add this code above the code given in step 3.
             <b:if cond=’data:blog.pageType == &quot;item&quot;’>
<div id='content'>
Adsense code placing center
</div>
</b:if> 

Step 6 : Replace the red text with your AdSense ad code.

Step 7 : Save the template and that's it. You are done.

Congrats !! You have successfully added the AdSense ad below the first paragrapgh of your every post.

I hope you liked this guide on adding AdSense ad below the first paragraph. If you faced any problem or have any confusion in any of the above steps then feel free to ask in the comments below. I will be happy to help you.
Thanks for reading


Read More