Saturday, 13 August 2016

// // Leave a Comment

How To Write A Guest Post

Guest posting is a creative way of writing new articles on other's websites and blogs. This is an amazing way of sharing your content through other's platform. By writing your post on other, not only their readership will increase, but people will also follow to your own blog through backlinks provided by the host. It will help your blog to get more traffic and more subscribers.

How To Write A Guest Post?


Writing a guest post is not so simple as it sounds. It requires a lots of hard-work because writing a post in your blog is so easy as compared to writing on other's blog. It is not a easy job to get your post selected by the owner of that blog. You have to convince the owner that you are actually providing a good quality content that will help help their readers and help their blog to grow.

Here are some steps which you should follow to write a guest for others.
How To Write A Guest Post ?

1. First thing to write a guest post is to have a list of blogs that are willing to accept guest posts. There is a very simple way to find blogs that are ready to accept guest posts based on your niche.

2. Open Google search engine and look for the following terms - 
  •  "Your topic" + "write for us"
  • "Your topic" + "contribute"
Both of the above will generate a similar results 

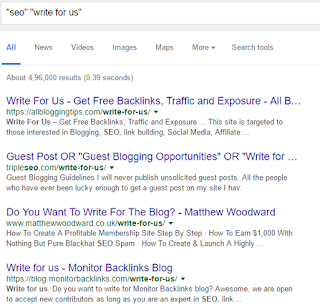
Here is an example how it works - 
How To Write A Guest Post?


A simple google search on the topic 'seo' helped me to find thousands of blogs that are willing to accept my guest post on their blogs.

3. After making the list of few blogs for which you are going to request them, you have to contact their administrator and convince them so that they will agree to post your post on their blog and provide you a few backlinks. 
For this you will be writing a mail to them to describe about yourself. Here is a good way to contact them  - 

Hey (Blogger Name),
I am huge fan of (Blog Name)
And I would love to be your next guest author.
To just give you an idea of the quality I will be bringing to you, here are some of my recent posts:
1. Link 1
2. Link 2
3. Link 3

Here are some ideas I have in my mind :
1. Guest post idea 1
2. Guest post idea 2
3. Guest post idea 3

Let me know what you think.
Keep up the awesome work at (Blog Name)
Regards,
Your Name 

This is a good way of approaching to the web masters. In this way they came to know about your past work and also the ideas which you have for their blogs. Some blogs provide their own format and requirements, so follow according to it in that case.

Some More Tips On Getting Your Guest Post Approved

1. Write your post first before approaching anyone. The blog owner may immediately respond to you and ask for the content and in that case if you don't have it , they may kick you out.

2. Every blog have a different style of writing. So before sending it to them, try to know and write your content in their blog's style.

3. Providing a sample content is very important for some web masters. They will look for your past guest post on other blogs and then only they will decide whether to accept your content or not. It is good to approach low authority blogs first and get some experience to show for the high authority web masters.

4. Writing the content which is relevant to their blog. They are not going to accept it if you are not writing which will help their readers.

5. Don't include your affiliate links without asking their permission. Mostly, they will not allow to add your affiliate links. Only they will provide you a few backlinks. 

6. Don't give the web owner too much of work i.e your post should be completed byline, formatted and all the necessary images also included on your server so that the blog owner can directly post it without doing much efforts.


I hope this post helped you in writing guest posts. If you have any query or something additional to share with me then feel free to post in the comments below.
Thanks For Reading
Read More

Tuesday, 2 February 2016

// // Leave a Comment

How To Protect Your Online Content From Thieves

As you all know, that writing and posting valuable content for your website or blog takes a lot of time and hard-work. All the efforts in creating a fresh and valuable content for your blog gets copied or stolen by thieves by just few clicks. Your content is your most important asset and you can't allow anyone to come and copy it somewhere else.

How To Protect Your Online Content From Thieves


Protecting your content from such thieves is the duty of every webmaster. It is not easy to look for each and every post of your site but you must do some hard-work to protect your blog's content as much as possible. In this post, I am going to tell you some methods by which you can protect your online content.

Disable Right Click

This is the very simple and most useful tip in preventing online content. Most people don't copy your content by typing line by line,  rather they just select and copy the content into their page. By disabling right click of mouse on your web pages, people can't select and copy the content. This is the best way to protect your work from thieves.

How To Protect Your Online Content From Thieves

Disable Right Click In Blogger

It is very easy to disable right click in blogger blog. Just follow these simple steps given below.

1. Login to your blogger's account.
2. Open your blogger dashboard and go to layout menu. Add a new gadget HTML/Javascript.
3. Copy and paste the following code into it. 
<!--MBW Code--><script language='JavaScript1.2'>function disableselect(e){return false}function reEnable(){return true}document.onselectstart=new Function ("return false")if (window.sidebar){document.onmousedown=disableselectdocument.onclick=reEnable}</script><!--Code End http://mybloggersworld.blogspot.in>

4. Save the gadget.

Now, you will see that the right click is disabled on your blog. 

Disable Right Click In Wordpress

It is much easier to disable right click on a wordpress blog than a blogger blog. There are so many plugins available for a wordpress user. Click here and install this plugin on your blog to use this feature on it.

Add Watermarks and Copyright notice

Copyright notices are the 2-3 lines of text which shows or tells the readers that the written post belongs to you and copying some or whole of it is against laws. These notices works great because by seeing such notice they will fear that they are breaking a law. Also, it don't take too much of time in adding such copyright notices with your post. 

How To Protect Your Online Content From Thieves


In similar way, you can also protect the pictures of your websites by adding a watermark. Adding a watermark makes the picture completely belongs to you and your site. People usually don't copy such pictures because using those pictures with your watermark will be awkward for them also.

Sometimes it also happen that people are not aware about copyright issues. They simply copy the content and not aware that they are stealing something. By using watermarks and copyright notices, you can avoid those people from copying your content.

Set Google Alerts

Protecting your content is one thing and catching the thieves who already copied your content is another important thing. After using all the necessary measures, there is always a chance of your content getting stolen by others. Google Alerts is a way to catch those people who are using your original content.

How To Protect Your Online Content From Thieves


Whenever someone copy and post your content, you will get a alert. To get an alert, you first copy few lines of your post and creates alerts to be notified when this content appear online. Creating multiple alerts for the same post works best. Also, it is better to set alert from the first paragraph because people usually copy first paragraph more than the rest.

By knowing who has copied your content, you can check whether they provided a link to your site or not. 

If your content is already copied ?

The above methods are the best measures to protect your content from thieves but, what about the content which may have already stolen by someone. How to know whether your post is republished at any other place and if yes, how to find it ?

The answer of above question falls in this section. Here, I am going to show tell you about the 2 best tool to search your content on the web.

Search Your Content

There are so many tools available to conduct a search of the web for any content given by you. One of such tool is Copyscape. Copyscape is a website on which you can put the URL of your post and then it searches the web for a web page containing the same content as in your link. It will tell you whether your content is safe or stolen by some thief.

How To Protect Your Online Content From Thieves


Search Your Images Using Reverse Image Search

Like text, you can also search for images. If you have a particular image and you want to know if there is any copy of it on the web, then you can use a reverse image search tool. In this kind of tool, you simply have to upload the image (no matters what name you have given to it), then it will search web to find out its exact copy and show you the results. If that image is not stolen then it will only show your website in the result.

How To Protect Your Online Content From Thieves


Google Images is the best tool for this purpose. Click here to try it.

How to deal with theft ?

After doing so much of hard-work to secure your content there is always chances of getting your work copied. Whenever you came to know that your content is copied, your next step is to contact that website owner and discuss the matter. 

Prepare your evidence

It is important to prepare your evidence first before contacting the person because there is no proof that he copied your content from your website. You should be ready with proper proof that you were the first to publish that content online.

If your content is indexed on Google then you can show that date as a proof because you posted that content earlier than someone else.

Contact the Thief

After creating all the necessary evidences, its time to talk to that person. First, you should send a friendly message telling the person that he copied his content. You can decide whether you want that content to be removed from that site or you want a back link to your site indicating that you are the first one to publish that article.

In most of the cases, the blog owner will remove the content and your blog's content and ranking will be saved. If you get a negative reply to your friendly message or the blog owner not giving any reply then you can follow the next step.

Contact hosting provider

Now, its time to become serious and punish that person. You should contact their hosting provider and tell them what this website owner done to you. Here, you have to show your evidences and prove them that you are owner of that content. 

After this, their hosting provider will force him to remove that content and it is also possible that they will permanently remove his account. I am sure that till here your problem will get solved but if still you are struggling, then move to the last and most important step to remove that stolen content.

File DMCA Complaint

DMCA stands for Digital Millennium Copyright Act. You can submit a complaint to DMCA to tell them to deindex content which was stolen from your website. This is a very quick process and the stolen content will get removed within a short period of time. 

DMCA also provides you so many useful tools to protect your online content.  


These are some of the ways by which you can protect your online content. I hope you liked it.

Now its time to share your thoughts with me and the others.

Thanks for reading and don't forget to share it with others.


Read More

Sunday, 15 November 2015

// // Leave a Comment

How To Place AdSense Ad Just Below The First Paragrapgh ?

AdSense is the great source of earning money from a blog but there seems to be a major impact on earning due to the placement of ads on different places in the blog. Bloggers keeps on trying different techniques to get more clicks on their ads. You can try many places like headers, inside blog post, bottom of the post, sidebars etc. One of the best place to get more clicks is to put AdSense ad below the first paragraph of your post.

How To Place AdSense Ad Just Below The First Paragrapgh ?


It is not possible to directly put AdSense ad below the first paragraph. You have to make certain changes to avail this feature in your blog. In this post, I will guide you step by step to use this thing on your blog too. Just follow the below steps carefully.

Place AdSense Ad Just Below The First Paragraph

Step 1 : Open your blogger dashbaord. Go to Template  and edit the template in HTML form.

Step 2 : Search for <data:post.body/> using Ctrl+F. You may find it more than once, just stick to the second occurrence.

Step 3 : Now, replace it with the following given code.
             <div id='target'><data:post.body/></div>

Step 4 : Copy and paste the following code just below it.
              <script type='text/javascript'>
function insertAfter(addition,target) {
var parent = target.parentNode;
if (parent.lastChild == target) {
parent.appendChild(addition);
} else {
parent.insertBefore(addition,target.nextSibling);
}
}
var adscont = document.getElementById(&quot;content&quot;);
var target = document.getElementById(&quot;target&quot;);
var linebreak = target.getElementsByTagName(&quot;br&quot;);
if (linebreak.length &gt; 0){
insertAfter(adscont,linebreak[0]);


Step 5 : Add this code above the code given in step 3.
             <b:if cond=’data:blog.pageType == &quot;item&quot;’>
<div id='content'>
Adsense code placing center
</div>
</b:if> 

Step 6 : Replace the red text with your AdSense ad code.

Step 7 : Save the template and that's it. You are done.

Congrats !! You have successfully added the AdSense ad below the first paragrapgh of your every post.

I hope you liked this guide on adding AdSense ad below the first paragraph. If you faced any problem or have any confusion in any of the above steps then feel free to ask in the comments below. I will be happy to help you.
Thanks for reading


Read More

Thursday, 10 September 2015

// // Leave a Comment

How To Add Search Description To Individual Post In Blogger

SEO is the most important part of any post and when done correctly, it rewards you with tons of traffic. One of the important part of SEO is meta description or tags. Adding search description to individual post is very useful to rank higher and faster. A clear and brief search description helps your post to get more number of clicks.

How To Add Search Description To Individual Post In Blogger


In this post, I will show you how to add a search description or meta tags to a specific post in blogger. First we have to enable search description from bloggers account settings and then we will we able to add search description to our individual posts. Follow the simple steps given below carefully.

Add Search Description To Individual Post In Blogger

Step 1 : Open your blogger's dashbaord. Go to Settings > Search Preferences > Meta Tags.
Enable the description setting and Save it.

How To Add Search Description To Individual Post In Blogger

Step 2 : Now, write a new post or edit the previous one. You will see a new 'Search Description' button at the right side of the page as shown below.

How To Add Search Description To Individual Post In Blogger

Step 3 : Click on it and write a brief description of your post and click on 'Done'. Don't use more than 150 words.
How To Add Search Description To Individual Post In Blogger

Publish the post and that's it. You have successfully added the search description to your post.

This was a very simple tutorial on adding search description in individual post in blogger blog. I hope you liked it. If you have any problem related to this then don't hesitate to ask me. I will be happy to help you.
Read More

Monday, 31 August 2015

// // Leave a Comment

How To Share Your Post To All Facebook Friends And Groups With a Single Click

When you write a new post, the next important task is to share your work with the world. The most important tool which almost everyone uses is Facebook. Sharing new post on Facebook groups and with your friends gives you lot of traffic.

This task seems to be easy but in reality, it takes too much time. Each time you need to open a group, then paste your link manually inside it. This is a very slow process and if want to share your post in atleast 50 groups, then you have invest around 1-2 hours in this task.

How To Share Your Post To All Facebook Friends And Groups With a Single Click


Today, In this post, I will show you a very smart way of sharing a new post with Facebook friends and groups. Using this method you will be able to do this work in less than 5 minutes. Follow the steps given below carefully.

Share Your Post To All Facebook Friends/Groups With a Single Click

Step 1 : Go to Share This and register a new account.

Step 2 : Select the platform on which your blog is hosted. Customize the sharing options of the widget and don't forgot to add Facebook Send button on it.

Step 3 : After completing all the steps, you will get a HTML code. Copy the code and paste it into a new widget in your blog.

Step 4 : Now below your every post, you will see a set of sharing buttons on different social media. Now, click at the Facebook Send button.
How To Share Your Post To All Facebook Friends And Groups With a Single Click


Step 5 : Now, add many as recipients as you want. You can add your friends and groups on which you want to share it. It will not take more than 5 minutes in doing this work. Click on send button and your content will be shared with everyone.

How To Share Your Post To All Facebook Friends And Groups With a Single Click


I hope you liked this tutorial on sharing new post in all Facebook groups with just a single click. If you have any query then don't hesitate to ask in the comments below or you can also contact me on Facebook or G-mail. Also, share this trick with your friends too.
Read More

Saturday, 16 May 2015

// // Leave a Comment

How To Install Google Fonts On Blogger Blog

Nowadays, people are not using the same fonts given by blogger. They just trying to customize their blog in every aspect and the font is one of them. We can easily use our desired fonts on our blog's titles and body content. You can easily host your fonts on a server by paying a decent amount. You can also use some free services like Google Fonts to make your blog's fonts beautiful.

How To Install Google Fonts On Blogger Blog


Google fonts is the largest font's inventory. It has thousands of different fonts and the implementation is also very easy. In this post, I will show you how can install a Google Font on your blogger blog. Follow the steps given below and start using the attractive Google Fonts on your blog without spending a penny.

How To Install Google Fonts On Blogger Blog

Step 1 : Go to Google Fonts and you will be able to see the free inventory of web fonts. Take your time and look for the best font for your requirement. You can write a sample text and see how it looks. 
How To Install Google Fonts On Blogger Blog

Step 2 : After selecting your favorite font style, click on 'Quick Use' button and proceed to next step.
How To Install Google Fonts On Blogger Blog


Step 3 : Now choose the size of the font according to the need of your blog. You can choose more than one options but this will decrease the page speed of your blog. There is also a page speed meter shown on the right part of the page. Try to be in the green part of it.

How To Install Google Fonts On Blogger Blog


Step 4 : Now scroll down the page and you will see a link. Copy the link in a notepad file and proceed to next step.

How To Install Google Fonts On Blogger Blog


Step 5 : Open your blogger account. Go to 'Template' and edit the template in HTML form. Search for </head> and paste the copied code just above it.
Remember, you have to put </link> after the copied text to close the <link> tag.


Step 6 : To use the font, you have to integrate it with your CSS
How To Install Google Fonts On Blogger Blog

1. If you want to implement it on your title, the you will use the following code-
    .post-title {font-family: 'FONT NAME'; } 

2. If you want to implement it on your post body, then you will use the following code-
   .post-body {font-family: 'FONT NAME'; }

3. If you don't want to implement the font style on a certain portion of your text, the use the following code - 
   <span style="font-family: FONT NAME;">Your-Text-Here</span>

After successfully going over the above steps, you will have your desired font style on your blog.

I hope this tutorial helped you to install your preferred font style on your blogger blog. If you faced any difficulty in using it, then feel free to ask in the comments below.
Read More

Thursday, 14 May 2015

// // Leave a Comment

How To Use Google Disavow Link Tool To Remove Spam

Many webmasters regularly face the problem of spam links on their website. You may have also discovered unnatural linking of your website on different sites and directories. It is important for us to remove those links as to protect our content and prevent our website from losing its rank.

How To Use Google Disavow Link Tool To Remove Spam


You can spent days on removing spam links and still you might facing some problem to remove some of those spams. Google introduced a tool which helps to remove any kind of spam link. They named the tool as 'Disavow Tool'. This tool will help webmasters to remove those spammy links which are linking to your website. By using this tool, you are informing the search engines that they should not count those link which are from a unwanted source. In this post, I will show you how you can use this tool to remove the spams from your website.

How To Use Google Disavow Link Tool To Remove Spam

  • Go to Google Disavow Tool
  • Now, you will see the list of your websites which you already verified on google webmasters tool. Select the one out of them from which you wants to remove spam. Click on 'Disavow button'.

How To Use Google Disavow Link Tool To Remove Spam

Note : This is an advanced feature and should only be used with caution. If used incorrectly, this feature can potentially harm your site's performance in Google's search results. We recommend that you only disavow backlinks if you believe that there are a considerable number of spammy, artificial, or low-quality links pointing to your site, and if you are confident that the links are causing issues for you.


  • Now, you have to upload a text file containing the those links which you wants to remove. Given below is a example of it.
http://spammedlinks2.com/here-is-spam-links.html
http://spammedlinks2.com/spam-is-bad.html
http://spammedlinks2.com/another-spam-link-database.html

Write the links in a notepad file and save it to your hard disk. Now upload the file on this tool as shown below.

How To Use Google Disavow Link Tool To Remove Spam


  • Click on submit button and you are done with it.

Use this tool only when you are unable to handle the spammy links on your own. As mentioned above, this tool is not for everyone. So, use it very carefully. 

Read More

Tuesday, 12 May 2015

// // Leave a Comment

How To Declare Website Language In Blogger

Do you ever thought of declaring the language for your website. Declaring a website language doesn't means anything to the readers because they already know what language you are using and that's why they are reading your content. Declaring a language helps the search engines to detect the content language faster. So it means that it is a good way of Search Engine Optimization. Your content will be indexed faster because it is now more easily crawled by crawlers.

How To Declare Website Language In Blogger


Most of the blogging platform have built-in language declaration facility but, blogger don't have this feature. We have to do this manually in a blogger blog by adding HTML or XML attribution. In this small guide, you will learn how to add language attribution in your blog.

How To Declare Website Language In Blogger

Step 1 : Open your blogger account. Go to Template and edit the template in HTML form.
How To Declare Website Language In Blogger


Step 2 :  Search for <html tag and paste the following line just below it.
lang="en-US" xml:lang="en-US"

After pasting the above code in your template, your template will look like something given below.
<html  lang="en-US" xml:lang="en-US" 
b:version='2' class='v2' expr:dir='data:blog.languageDirection' xmlns='http://www.w3.org/1999/xhtml' 
xmlns:b='http://www.google.com/2005/gml/b' 
xmlns:data='http://www.google.com/2005/gml/data'


Step 3 : Save the template and you are done with it.

Note : Change the language code 'en' with the desired language code of yours.

Given below are the ISO language codes for different languages across the world.


LanguageISO Code
Abkhazianab
Afaraa
Afrikaansaf
Albaniansq
Amharicam
Arabicar
Aragonesean
Armenianhy
Assameseas
Aymaraay
Azerbaijaniaz
Bashkirba
Basqueeu
Bengali (Bangla)bn
Bhutanidz
Biharibh
Bislamabi
Bretonbr
Bulgarianbg
Burmesemy
Byelorussian (Belarusian)be
Cambodiankm
Catalanca
Cherokee
Chewa
Chinese (Simplified)zh
Chinese (Traditional)zh
Corsicanco
Croatianhr
Czechcs
Danishda
Divehi
Dutchnl
Edo
Englishen
Esperantoeo
Estonianet
Faeroesefo
Farsifa
Fijifj
Finnishfi
Flemish
Frenchfr
Frisianfy
Fulfulde
Galiciangl
Gaelic (Scottish)gd
Gaelic (Manx)gv
Georgianka
Germande
Greekel
Greenlandickl
Guaranign
Gujaratigu
Haitian Creoleht
Hausaha
Hawaiian
Hebrewhe, iw
Hindihi
Hungarianhu
Ibibio
Icelandicis
Idoio
Igbo
Indonesianid, in
Interlinguaia
Interlingueie
Inuktitutiu
Inupiakik
Irishga
Italianit
Japaneseja
Javanesejv
Kannadakn
Kanuri
Kashmiriks
Kazakhkk
Kinyarwanda (Ruanda)rw
Kirghizky
Kirundi (Rundi)rn
Konkani
Koreanko
Kurdishku
Laothianlo
Latinla
Latvian (Lettish)lv
Limburgish ( Limburger)li
Lingalaln
Lithuanianlt
Macedonianmk
Malagasymg
Malayms
Malayalamml
Maltesemt
Maorimi
Marathimr
Moldavianmo
Mongolianmn
Nauruna
Nepaline
Norwegianno
Occitanoc
Oriyaor
Oromo (Afaan Oromo)om
Papiamentu
Pashto (Pushto)ps
Polishpl
Portuguesept
Punjabipa
Quechuaqu
Rhaeto-Romancerm
Romanianro
Russianru
Sami (Lappish)
Samoansm
Sangrosg
Sanskritsa
Serbiansr
Serbo-Croatiansh
Sesothost
Setswanatn
Shonasn
Sichuan Yiii
Sindhisd
Sinhalesesi
Siswatiss
Slovaksk
Sloveniansl
Somaliso
Spanishes
Sundanesesu
Swahili (Kiswahili)sw
Swedishsv
Syriac
Tagalogtl
Tajiktg
Tamazight
Tamilta
Tatartt
Telugute
Thaith
Tibetanbo
Tigrinyati
Tongato
Tsongats
Turkishtr
Turkmentk
Twitw
Uighurug
Ukrainianuk
Urduur
Uzbekuz
Venda
Vietnamesevi
Volapükvo
Wallonwa
Welshcy
Wolofwo
Xhosaxh
Yi
Yiddishyi, ji
Yorubayo
Zuluzu


I hope this small guide helped you to declare the language of your blog. Don't hesitate to ask anything related to this in the comments below.

Read More

Saturday, 9 May 2015

// // Leave a Comment

How To Monitor Server Uptime And Downtime In Blogger Blog

Have you ever observed that your blog or any other blog which you are trying to open stopped responding. This situation is commonly known as server downtime. In this case, the blog or any web page is temporarily unavailable to the user. This can happens with anyone's blog and there is no time when it will going to happen. You can't sit 24 hours in front of your blog to check when it will going to happen again. All this crates a bad experience to the user and also if this happens frequently, then you blog's reputation is on stake.

How To Monitor Server Uptime And Downtime In Blogger Blog


There are so many disadvantages of server downtime. Some of them are listed below.

  • Your blog will start to lose traffic because visitors will get annoyed of it and don't want to come again
  • Bounce rate of your blog will be increased
  • Your google rank will get affected because search engines don't like websites having frequent downtime
  • Your earning will be decreased

Although, blogger is a google property and it rarely goes downtime. But, using certain third party plugins can affect your blog to go downtime. In this post, I will show you a way by which you can easily monitor your blog and you will came to know when your blog server goes downtime and you will also get the reason behind it.

How To Monitor Server Uptime And Downtime In Blogger Blog

Site24*7 is a website which helps to monitor the uptime and downtime of any website. You can use this to monitor your blog and you will get notifications when your blog server goes downtime. You can decide the monitoring frequency and it can check for every seconds your website. Whenever there is any downtime, you will get an email regarding it.

To use this amazing service for your blog also, simply follow these simple steps.

Step 1 : Go to http://www.site24x7.com/site24x7-pricing.html and sign up for a free account as shown below. You can choose other paid plans if you wish.

How To Monitor Server Uptime And Downtime In Blogger Blog


Step 2 : Fill the details about you for sign up or you can also use Facebook, Google or Yahoo account to sign up.

How To Monitor Server Uptime And Downtime In Blogger Blog

Step 3 : Now, login to your account and go to 'Admin' section and select Add monitor.

How To Monitor Server Uptime And Downtime In Blogger Blog


Step 4 : Now fill the required details as shown below.

Display Name - Write a name for you campaign so you can remember it in future.
Website address - Write the URL of your blog or website.
Check Frequency - Select the frequency for your website check. Select it 10 minutes if you are using a free account.

How To Monitor Server Uptime And Downtime In Blogger Blog

Keep other thing unchanged and Save the settings.

Congrats !! now you're up and running. Site24*7 will start monitoring right away.

I hope you liked this tutorial in monitoring your blogs server uptime and downtime.
If you have any question then feel free to ask.
Read More

Thursday, 7 May 2015

// // Leave a Comment

How To Replace Default Blogger Scrollbar With Custom WebKit Scrollbar

Scrollbar appears at the right side of any page and it helps the user to scroll up and down the page. We already knows about the scroll bar in a default blogger template. To have a good experience for the user, the scroll bar should be smooth. Although, the default scroll bar is good enough and working without any complaint but, adding a newly customized scroll bar makes your blog more attractive.

How To Replace Default Blogger Scrollbar With Custom WebKit Scrollbar


WebKit scrollbar provides you with a very beautiful and smooth working scroll bar. The scroll bar is user friendly and makes your blog more professional. In this post, I will show you how you can also implement WebKit scrollbar in your blog. Just follow these simple steps given below.

Replace Default Blogger Scrollbar with Custom WebKit Scrollbar

Step 1 : Open your blogger's dashbaord. Go to 'Template' and edit the template in HTML form.

How To Replace Default Blogger Scrollbar With Custom WebKit Scrollbar

Step 2 : Now click anywhere inside the code box and using the keys Control+F, open search box.

How To Replace Default Blogger Scrollbar With Custom WebKit Scrollbar


Step 3 : Search for ]]></b:skin>

Step 4 : Now paste the following code just above it.
             /* For the "inset" look only */
html {
    overflow: auto;
}
body {
    position: absolute;
    top: 20px;
    left: 20px;
    bottom: 20px;
    right: 20px;
    padding: 30px; 
    overflow-y: scroll;
    overflow-x: hidden;
}

/* Let's get this party started */
::-webkit-scrollbar {
    width: 12px;
}
/* Track */
::-webkit-scrollbar-track {
    -webkit-box-shadow: inset 0 0 6px rgba(0,0,0,0.3); 
    -webkit-border-radius: 10px;
    border-radius: 10px;
}
/* Handle */
::-webkit-scrollbar-thumb {
    -webkit-border-radius: 10px;
    border-radius: 10px;
    background: rgba(255,0,0,0.8); 
    -webkit-box-shadow: inset 0 0 6px rgba(0,0,0,0.5); 
}
::-webkit-scrollbar-thumb:window-inactive {
background: rgba(255,0,0,0.4); 
}


Step 5 : Save the template and that's it. You have successfully changed your default blogger scrollbar.

I hope this small tutorial helped you to add WebKit scrollbar in your blog. If you faced any problem then feel free to ask below in the comments.

Read More