Monday, 25 January 2016

// // Leave a Comment

How To Turn On And Turn Off Subtitles In VLC Media Player

Today, VLC is the best and most used media player in the world. People like to run their videos in this media player because it supports almost all the formats. It is very easy to use and you not need any skills to use it. VLC is available for both Windows and MAC.

How To Turn On And Turn Off Subtitles In VLC Media Player


One of its amazing features is the capability to run subtitles. Subtitles is used to show the audio in text format in some other language to make the clip understandable to people of different origins.
Sometimes it is useful for one person and annoying for other. In this post, I will show you methods by which you can turn on and turn off subtitles in VLC media player as per your needs.
Turn On Subtitles In VLC Media Player

Step 1 : Subtitles can be added to a video with the help of a .srt file. To run subtitles in a specific video, you need its srt file.You can easily download the srt file for a movie from the internet. Its size is very small.

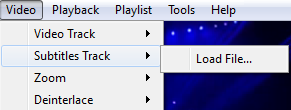
Step 2 : Open the video file in VLC. Go to Video>>Subtitles Track>>Load file.

How To Turn On And Turn Off Subtitles In VLC Media Player


Step 3 : Now, look for the saved srt file and open it. That's it. Now you can see subtitles below your video.
How To Turn On And Turn Off Subtitles In VLC Media Player


Turn Off Subtitles In VLC Media Player

Method 1

Step 1 : Open the desired video file in VLC.

Step 2 : Go to Video>>Subtitle track >> Disable.

How To Turn On And Turn Off Subtitles In VLC Media Player

Now, you will not see any subtitles.

Method 2

If first method don't works for your video, then you can use this alternate method.

Step 1 : Launch VLC media player and run the desired video file in it.

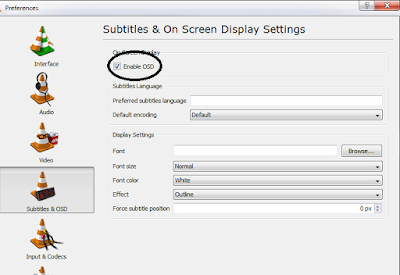
Step 2 : Go to Tools>>Preferences>>Subtitles & OSD.

How To Turn On And Turn Off Subtitles In VLC Media Player


Step 3 : Uncheck all the option like enable OSD, enable subtitles etc.

  Congrats !! You are done with it. You have successfully removed subtitles from your video.

This was a very simple guide on turning on and off subtitles in VLC media player. I hope you liked it.
Thanks For Reading


Read More

Tuesday, 28 July 2015

// // Leave a Comment

How to Hide Private Folders using Command Prompt or CMD

Sometimes you may want to hide some specific pictures or videos or may be any other personal documents which you don't want to show others. May be you are a parent who wants to hide something from your children or a child who wants to hide his personal things from your parents or siblings.

Most of the people knows how to hide a folder by simply going into its properties and hide it. This will definitely hide that folder but you are not fully sure that it will be safe from others because those who have a little knowledge of computers can easily reach it.

How to Hide Private Folder using Command Prompt or CMD


In this post, I will show you a different method to hide a folder from your computer after which no one will reach it. Only you have the information to see that folder and its contents. You will also going to learn some new things about command prompt. Follow all the steps very carefully.

Hide Private Folder Using Command Prompt or CMD

Step 1 : First, open cmd. (To open cmd or command prompt, go to start >> run and inside it type cmd and hit enter. A black screen will appear)

How to Hide Private Folder using Command Prompt or CMD


Step 2 : In the above picture, you will see a address which is by default. It can be any other name on your system. Here now we will in C drive. We are currently in the folder name 'KD' which is inside in another folder 'Users'.
Now suppose, I want to hide a folder 'wallpapers'. The path of this folder is - E:\Cricket\Wallpapers.
To do this task first we have to change our drive from C to E.
Write E: to change it.
How to Hide Private Folder using Command Prompt or CMD


Step 3 : Now we are in the E drive. Now, we are required to go inside the folder cricket because our final folder which we want to hide is inside it. To go inside a folder we will use a command 'cd'. Every time when you want to go inside a folder, type 'cd your folder name' and hit enter. 
Here I will type 'cd cricket'.

How to Hide Private Folder using Command Prompt or CMD


Step 4 : So we are finally inside the folder 'Cricket'. Now we aim to hide the folder 'Wallpapers' which is in cricket. We don't have to go inside it. We will do this task from here only.
To hide the folder 'wallpapers' we will write   - " attrib +S +H +R wallpapers". Press enter button and this folder will no more be shown.

How to Hide Private Folder using Command Prompt or CMD


Step 5 : Congrats! You have successfully hidden a folder from others. Now, no one will ever reach those files. But the problem is that you also can't use it. So you have to unhide it to reach and use its content. Its not a big task, just type  "attrib -S -H -R wallpaper" and everything will be restored.

How to Hide Private Folder using Command Prompt or CMD


Note : You must always remember the path of the hidden folder because you will not be able to unhide it without knowing its correct path.

I hope this tutorial will be helpful for you to hide your personal data on your computer. If you face any problem in doing this then feel free to ask me in the comments below or you can also mail me. I will be happy to help you. Share this with your friends too.

Read More

Monday, 27 July 2015

// // Leave a Comment

How To Format PC/Laptop Using USB Pendrives

Most of us only knows how to format a PC or Laptop with a CD/DVD. But, we can also format our PC using USB pen drive. Also, in many of the new notebooks, there is no option to format using optical disk. So, there is only one way of USB, available for formatting.
Also, formatting your PC or Laptop using a flash drive or pen drive is much faster than doing it with a DVD. Therefore, it  helps to save a lot of time and it also easy to carry somewhere.
Before we format our system with pen drive, we have to make our USB into a bootable USB.
In this tutorial, I will show you step by step how you can make your pen drive bootable to format your system.

How To Format PCLaptop Using USB Pendrives

How to format PC/Laptop using USB pendrive ?

Step 1 : Insert your pendrive in your computer and go to start menu and type run. In run type cmd and open the command prompt. A black window will appear like shown here.

How To Format PC/Laptop Using USB Pendrives


Step 2 : Now type 'diskpart' and hit Enter.This will run diskpart utility in a new window.

How To Format PC/Laptop Using USB Pendrives

Step 3 : Now type the command 'list disk' and hit Enter. This will show you the list of all the storage devices available on your PC/Laptop. Compare the size of the disk available to know the name of your USB drive.

How To Format PC/Laptop Using USB Pendrives

Here, you can easily find that the 'disk 1' is our USB pendrive. You should avoid using multiple USBs to avoid any confusion.


Step 4 : After knowing the correct disk, type 'select disk 1' (according to your system) and press Enter button to select the USB drive. You can also use the command 'detail disk' to check the details of the selected drive to verify that you have chosen the correct disk.

Step 5 : Now, you have run a list of commands shown below one by one.

  • clean 
  • create partition primary
  • select partition 1
  • active
  • format fs=fat32
  • assign 
  • exit
You have to enter these commands in the same order as shown above.

How To Format PC/Laptop Using USB Pendrives


Step 6 : After completing all the steps you will be out of it. Now your USB pen drive is ready to boot any PC or Laptop. Simply insert the CD/DVD of Windows XP/7/8 and copy all the content of it into your pen drive. When the copying process is completed, simply remove it and use that USB to format any PC or Laptop by booting it from a USB drive.

I hope you liked this small guide to format your PC/Laptop using a pen drive instead a CD/DVD. If you faced any problem then don't hesitate to ask me in the comments below. I will be happy to help you. Don't forget to share this to your friends. 


Read More